


Main Screen
This screen is initially displayed with a list of Decks of Cards or a message indicating that you need to add one. Create your own decks of cards that can be used to support your gaming system. You will begin by defining the deck itself. Then you will create "Named Decks" which represent the instances of those deck definitions that you will eventually use. By creating one or more "Named Decks" you can use the same deck definition in several games concurrently as each Named Deck will maintain its sorted order and drawn cards separately.
Selecting Named Decks
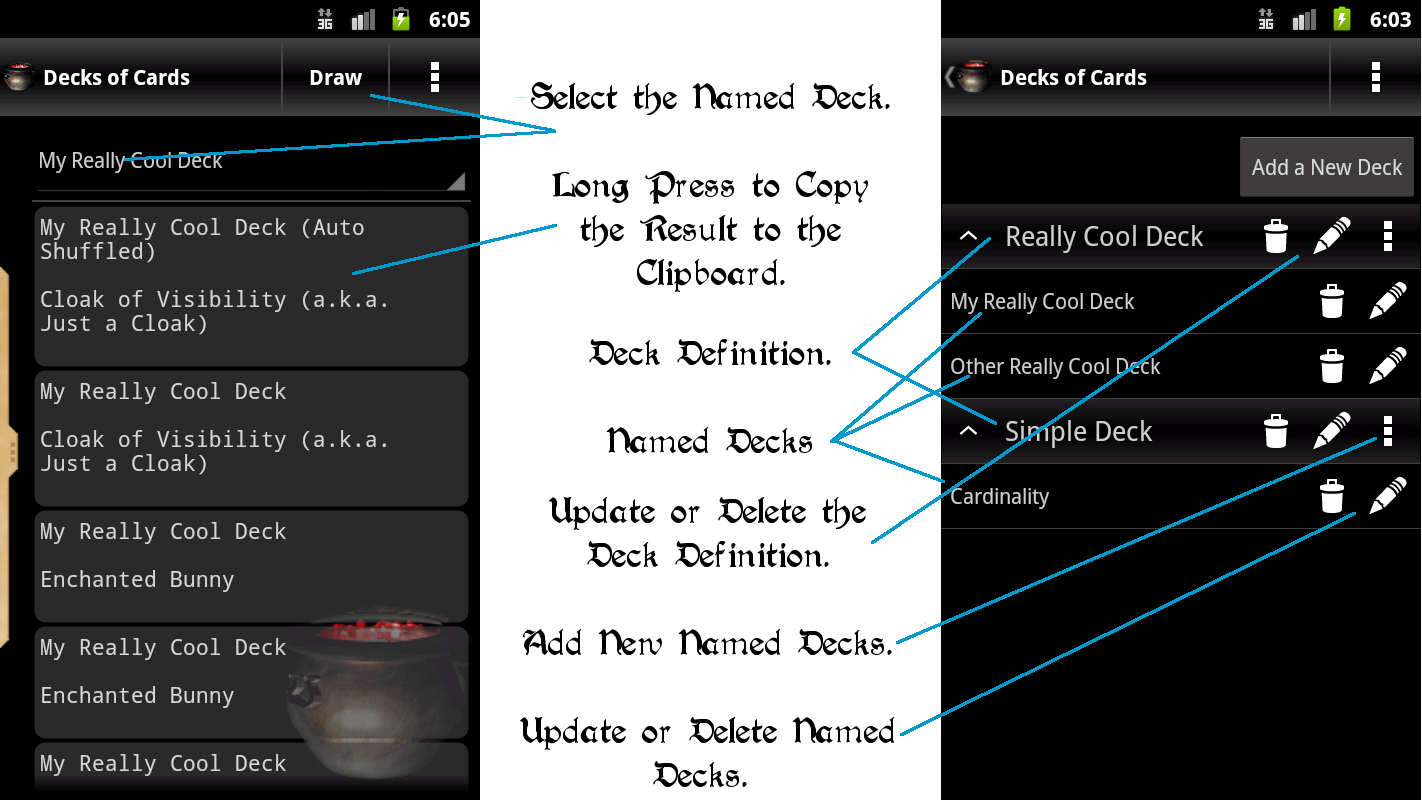
Each of the Named Decks will appear here in the list for you to select. Choose one from the drop down list. Select "Draw" button to draw the next card from the deck. If the last card has been drawn from the deck, it will automatically shuffle the deck and draw the next card. Note: This feature does not have the ability to maintain "hands".
Results
The results are displayed on this screen with the latest draw at the top. If you long-press on an individual result, you will have the option to copy it to the clipboard where it can be pasted anywhere to share.
Menu Items
Several features are accessible by using the menu on your device.
- Draw...
Draw the next card from the selected deck. - Shuffle...
Shuffle the cards in the selected deck. - Manage...
This will allow you to create and update all the deck definitions. - Clear Results
If the results list gets a little long, or you are switching games, this option will allow you to clear that list. - Share...
If you have an email application on your device, this will allow you to send all of your results from this page to someone. They will be copied into your email for you. - Help...
This will bring up the help system.
Manage Decks of Cards
This will show you all the Decks of Cards you have currently defined. It will also show you all the Named Decks that have been created. From here, you will manage these definition. On this screen you will find the following elements:
- Deck Definitions
List of the definitions for each of the Decks of Cards. - Named Decks
The Named Decks associated with their respective definitions. - Add New Deck
Button used to begin adding a new deck.
The primary menu for this activity offers you the following options:
- Import/Export
The Decks of Cards can be imported and exported so you can share them or work on them on another platform like a PC.
See Decks - Import/Export for more details on importing and exporting. - Help...
This will bring up the help system.
Add/Update Deck of Cards

Defining a Deck of Cards involves naming the deck and adding a list of cards that make up the deck. Each Card consists of a Display Name or Description Text that instructs you what to do when the Card is drawn. You will also define how many of these Cards appear in the Deck. Note: You can update the deck definitions at any time, however doing so will delete all Named Decks associated with this definition.
- Card Name
The face of the card which may include special formatting. - Preview
This will show you a preview of what the card will look like when selected. This can be helpful when applying custom formatting. - Entry Aid
The format option list is presented to facilitate the entry of the card. Select the element you'd like to insert and tap the clipboard next to it to have it inserted into the current cursor position. - Number of Cards
Number of times this card will appear in the deck.
Apply Custom Formatting
You can apply HTML-ish formatting options to the Card. These options include
| Format Option | How To |
|---|---|
| Bold | <b>Bold</b> |
| Italic | <i>Italic</i> |
| Underline | <u>Underline</u> |
| Big | <big>Big</big> |
| Small | <small>Small</small> |
| SuperScript | Super<sup>Script</sup> |
| SubScript | Sub<sub>Script</sub> |
| Line Break | <br /> |
This will make your XML import files a little more complicated if you choose to use the formatting options, but they could really make your results stand out. It's important to make sure you match the beginning and ending pair of tags when specifying the format. Notice how there is a beginning and ending tag for each element (except Line Break) above. These must be specified in pairs. You can use as many as you like, but they cannot overlap one-another.
| Example | Result |
|---|---|
| <b>Bold</b><i>Italic</i> | OK |
| <b>Bold <i>Bold and Italic</i></b> | OK - nested |
| <b>Bold <i>Italic</b></i> | Not OK. |
The Line Break is a special case. In this case you will begin and end the tag at the same time. Now, the formatting options are not that forgiving. If you make a mistake with the tags, it will not format the die face, but rather display the text in its raw form. Of course, if you are having problems, just drop us a note and we will be happy to help.
Add/Update a Named Deck

From the Manage Decks of Cards Activity, select the menu of the Deck Definition for which you wish to add the Named Deck and select "Add a New Named Deck". Provide a name for the Named Deck and it will be created and automatically shuffled.